Table of Contents
Instructional Planner Guide
Terms and Conventions
Unit Plan: All daily lessons are created within a Unit. This can be a Unit of time (April 20 – 24), a textbook Unit (Chapter 4: The American Revolution), or a concept/content Unit (Rocks and Minerals). A Unit can be as short as a day or as long as an entire year. A Unit must have a title, be associated with a class, as well as a start date and an end date.
Daily Plan: Daily Plans are designed to guide, monitor, and track instruction on a daily basis. The Elements in a Daily Plan can be printed in an Elements Report to identify what is planned within a Unit and what actually occurred in the classroom.
Elements: Elements are the instructional core of a Unit. Elements in a Unit Plan are used to guide the development of a Unit (Unit Description, Enduring Understandings, Objectives) while Elements in a Daily Plan help track and monitor daily instruction (Strategies, Activities, Accommodations, Differentiation). Elements can be a text box, a bulleted or numbered list, a checkbox, or a dropdown list. Any number of Elements can be created and named for their intended use (Strategies, Reflections, Resources, etc.). Elements that contain a bulleted list, numbered list, checkbox, or drop‐down are tracked by the system through the Daily Plan. Only individuals with administrative rights can design Elements. Elements are not transported to Curriculum Mapper®.
Template: Elements are used to build Templates teachers may use to construct Units. Several different Templates can be developed for various grade levels or instructional areas (Primary Template, Special Education Template, P.E. Template, Understanding by Design, etc.) or one Template can be created to guide the entire district. If no Templates are created, Units will consist of only Content, Skills, and Assessment. There are Unit Templates and Daily Templates. As teachers enter information or check off items in the Daily Plans, the system tracks that information so teachers can see those aspects of their teaching. Teachers can also create their own Templates if this is permitted by the Administrator.
Share: Any Unit can be shared with other teachers in the building. If a teacher shares a Unit, other teachers will have access to the Unit and can collectively build that Unit together. NOTE: If a teacher deletes information in a Shared Unit, that information is deleted for all teachers sharing that Unit. This is real time and does not require teachers to physically be in the same room or work at the same time. Once the Unit is built, teachers sharing the Unit must copy the Unit into their own accounts in order to work on their Daily Plans.
Block: Blocks are created within the Content, Skills, and Assessment section of the Unit/Daily Plan. Blocks are used to segment instruction, identify areas of emphasis, or place instruction within a specific timeframe. A Unit can be placed within one Block or any number of Blocks, depending upon the user. Blocks can be named for easy reference. In Language Arts, blocks can be useful in separating Reading, Writing, Listening, and Speaking while keep all of Language Arts within a Unit.
Structure: The outline Structure of the Content and Skills columns is pre‐set. The Structure is:
- Level 1
- Level 2
- Level 3
Whatever is entered in the Content column is automatically duplicated in the Skills column in order to maintain consistency and ensure that each column aligns with the other. The Assessment column is different in that it does not follow the same Structure. It is not necessary to use all three levels. However, once the depth has been determined, it must be used throughout that block. Assessments are typically grouped and this is how Instruction Planner was designed.
Publish: A school or district may want to create model Units which can be used by teachers throughout the school or district. These Units are created by one or more individual, saved, and then Published to the school or district Document Library where they can be copied into a teacher’s Unit Plan List. Any Unit can be Published, but only by individuals that have administrative access to Instruction Planner.
Operational Considerations
School Courses All School Courses must be established before teachers can enter Units. The process identical to setting up Courses in Curriculum Mapper. Course Name, Course Number, and Grade Level are required fields. It is recommended that a Subject Area be included. If a Course can be taken by students in more than one grade, then all possible grades should be checked.
Class Setup Before a Unit can be created, teachers need to set up their classes. The class will be selected from the drop‐down list. If there are multiple sections (Periods), the sections need to be added one at a time. If Units are to be exported to Curriculum Mapper, the name of the course in Instruction Planner must match the course name in Curriculum Mapper.
Document Files can be attached to Instruction Planner in a variety of areas, making it useful as a
Library repository for items used to teach, reinforce, or assess. Instruction Planner allows multiple documents to be attached at the same time.
Standards: It is necessary to Add Standards to the Unit or Daily Plan in order to attach Standards to a Unit. Standards from multiple grade levels and subject areas can be added to the Unit. Standards can only be attached in the Content, Skills, and/or Assessment areas.
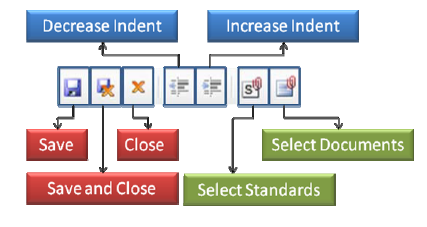
Edit Block In order to work with any Element, or the Content, Skills, and Assessment areas, it is necessary to Edit the section or Block. Only one area can be edited at a time. Any area being edited has a green border. Once an Element or Block is being edited, the options are: Save, Save and Close, and Close without saving.
Copy: If a Unit is being shared, teachers will need to copy the Unit into their accounts in order to begin putting information into their Daily Plans. Units also can be copied from one year to another.
Shift: Whole Units or parts of Units can be shifted to earlier or later dates. This feature is useful if previous Units run longer than anticipated. Teachers can move (shift) the Unit forward to establish a new start date. If school is cancelled for a day, any part of a Unit not yet taught can be moved to show that no teaching occurred on that date.
Menus and Toolbars
Unit Plan List Menu
Content, Skills, Assessment Tool Bar
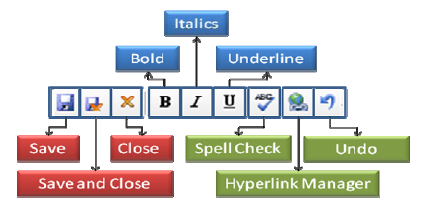
Text Element Tool Bar
Login
First Login
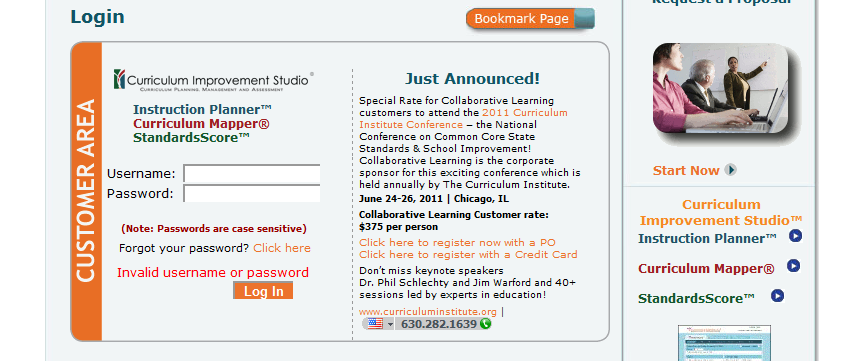
You will be given a form that contains a username and password for your initial login. You will then be asked to fill out a general information form. Collaborative Learning will then send you an e-mail that will confirm your information and allow you to change your username and password. (Check your SPAM folder of your e-mail if you don’t get the e-mail in a few hours.)
Login Errors
If you have trouble with the login, try the original username that came on the initial login form. No matter what you change your username to, you will always be able to login with the original user name. If you have further difficulty see Steve Schulten or Mike Holman.
Class Setup
- From the tool bar select “Setup”.
- A dropdown box will appear select “Class”.
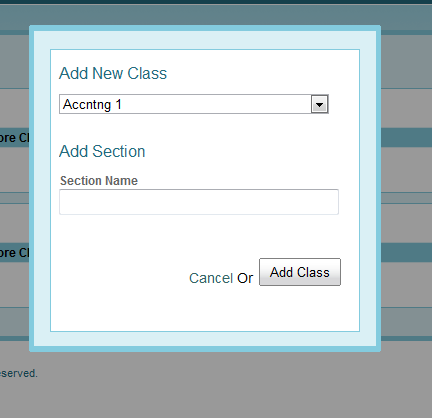
- Select “Add New Class”.
- Use the drop down box labeled “Add New Class” to select a class.
- If for some reason your class is not in the list see Steve Schulten.
- In the “Section Name” box put the name for the block that you intend to map. i.e. Block 4. Click “Add Class”.
Unit Plan List
- Click My Plans from the Menu Bar. (In the Unit Plan, Daily Plan, Reality Check, or Send To Curriculum Mapper view, click My Plans or < Back to My Plans).
Add New Unit
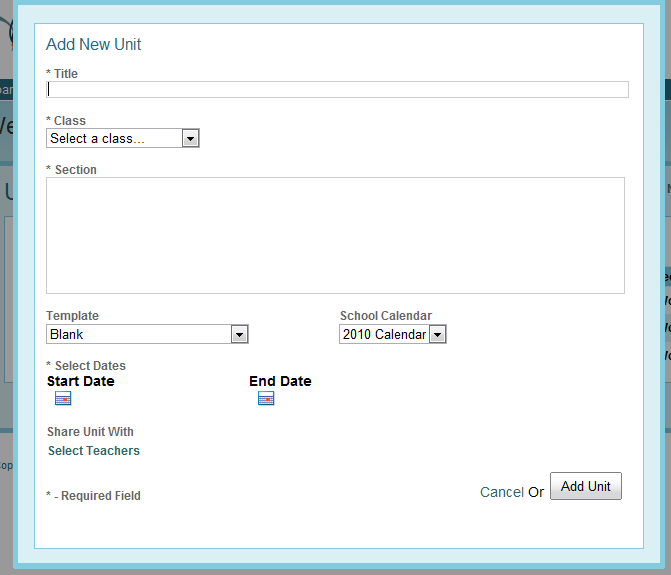
- In the Unit Plan List, on the Sub Menu, click Add New Unit.
- In the pop‐up window, enter a Title.
- Select the Class from the drop‐down list.
- Confirm the Sections to be included in this Unit. Instruction Planner automatically checks all
- sections. Uncheck any section that will not be included in the Unit.
- Select a created Template to be used for the Unit from the drop‐down list. If no template has been created, select Blank. School‐wide templates are created by the Instruction Planner administrator.
- Select the School Calendar from the drop‐down list.
- To set the Start Date and End Date of the Unit, click the Calendar icon under Start Date. In the popup window, click on the date the Unit begins and click on the date the Unit ends. If an incorrect Start or End Date is selected, click on Reset; click on the correct date.
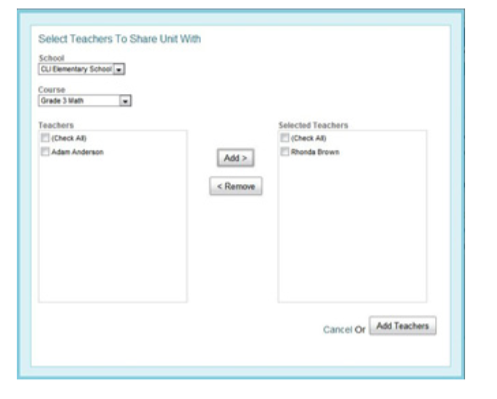
- If the teacher plans to Share the Unit with other teachers, click on Select Teacher, select the School, Course and mark the checkbox to the left of a teacher’s name. Click Add Teachers
- Click Submit Dates.
- Click Add Unit.
Note: You must establish a class before adding a Unit. See section on Setup for specific instructions.
Blocked Dates
- If a day in the range of dates has been blocked, a message will appear. If the blocked date is NOT to be included in the Unit, click in the checkbox. To include the day in the Unit, leave it unchecked.
- Click Use The Selected Date(s).
- If the Unit is to be shared with other teachers, select the names of the other teachers.
View Timeline
- In the Sub Menu, click View Timeline.
- Click Close to return to the Unit Plan List.
- To display a timeline for a particular Class, select the class from the All Classes drop‐down list then click View Timeline.
Content, Skills Assessment
Add New Block
- Choose a Title for the block if desired.
- Click in the Content column to begin entering statements.
- Hit the Enter key for the next letter in the outline (A, B, C, etc.).
- Hit the Tab key for the next level in the outline (1, 2, 3, etc.).
- Hit the Shift and Tab keys to return to the previous level in the outline.
- Text entered in the Content column automatically populates the Skills column to maintain
- consistency and ensure column alignment.
- Click in the Skills column to begin entering statements.
- Click the disk icon to save the information.
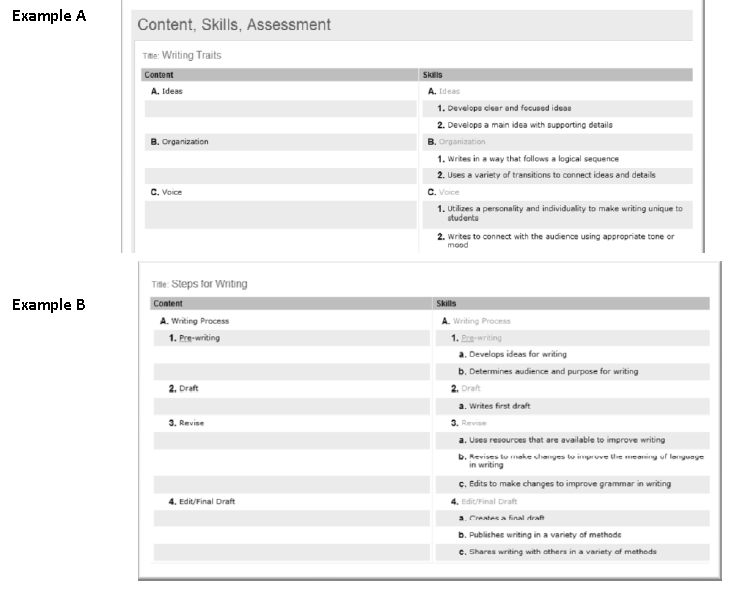
Note: In Example A, the Content column has one outline level (A., B., C.). In the Skills column, the skills are in the second outline level (1., 2., 3.) In Example B, there are two outline levels in the Content column (A., 1., 2., 3.) which translates to skills occupying the third level in the Skills column (a., b., c.). The structure is set after the first Content statement is entered and cannot be changed within the Block (i.e., skills should be at the second or third outline level but not both).
Adding an Assessment
- Click Edit Block.
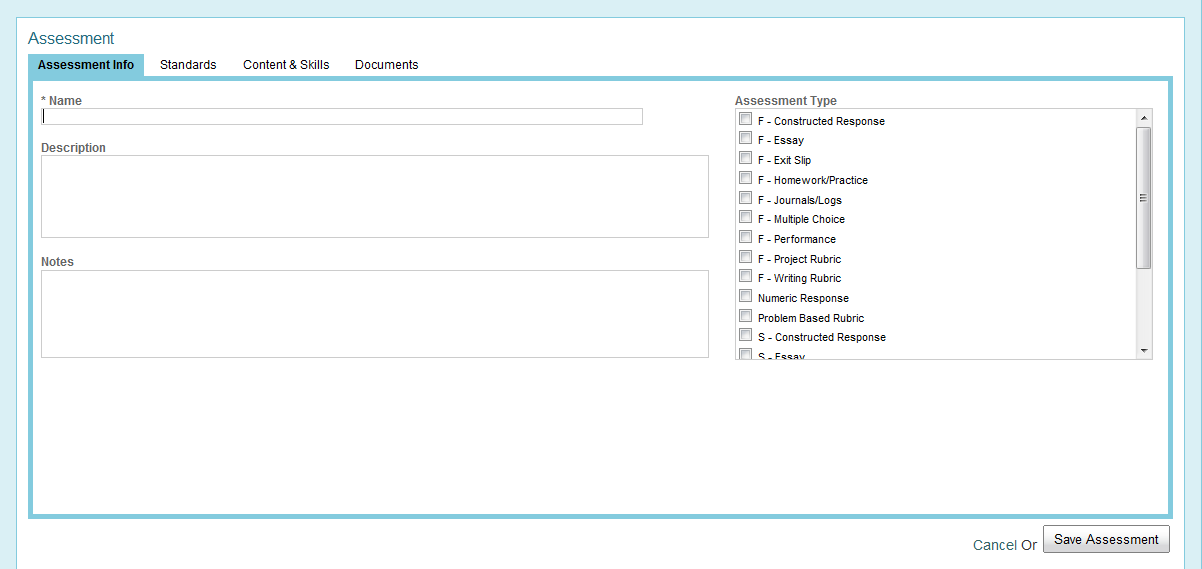
- Click Add Assessment.
- Provide a Description and Notes if desired (these are Options).
- If the Instruction Planner administrator has entered Assessment Types, click on those that reflect the type of assessment.
Associating an Assessment with Content or Skills
- While in the Assessment window, click Content & Skills.
- In the window, click on the content or skills associated with the Assessment.
- Click Save Assessment.
Adding Documents to Assessments
- While in the Assessment window, click Documents.
- Select the Library from the pull‐down list.
- Click in the box next to the file or files to be attached.
- Click Save Assessment.
Attaching Standards to Assessments
- While in the Assessment window, click Standards.
- Click in the checkboxes next to the Standards to be attached.
- Click Save Assessment.
Remove Attached Standards
- In the Assessment column, click on the Assessment with the attached Standards.
- Click on Standards (any Standard attached will be checked).
- Uncheck Standards to be removed (un‐checking all Standards will remove the Standards as well as the icon.
- Click Save Assessment.
Standards
Add Standards
- In the Standards section of either Unit Plan or Daily Plan, click the Select Standards icon.
- Select the Standards Set, Subject, and Level from the drop‐down menu.
- Click in the box(es) to the left of the desired standard(s).
- Click Add Standards to add selected standard(s) to the Unit.
- Repeat the previous steps to add standards from another Set, Subject, and/or Level.
Note: It is possible to Search the Standards, if so desired. If the Unit involves “main ideas,” that term can be entered in the Search box. Instruction Planner will display all standards with that term. Typing in the beginning letters of a word will display all variations of a term (e.g., classif will display: classify, classification, classified, classifying, etc.)
Search Standards
- To search for a specific term within the Standards, type search word in box to the right of Search.
- Click in the box (es) to the left of the desired standard(s).
- Click Add Standards to add selected standard(s) to the Unit.
- Repeat steps 1‐5 to add standards from another Set, Subject, and/or Level.
- Edit or remove selected Standards by clicking in the box to the left of the appropriate standard to remove the check.
- As appropriate, click Cancel or Add Standards at the bottom of the page.
- The Standards Block can be collapsed by clicking Hide and expanded by clicking Show.
Note: Typing “classif” will return all words beginning with those letters (classification, classifying, classify).
Attach Standards
- Place the cursor on the line where Standards are to be attached.
- Click the Select Standards Icon.
- Only previously added Standards will be displayed.
- Click the box to the left of a Standard to select that Standard (multiple standards can be checked)
- Choose Introduced, Developed, or Reinforced from the pull down list if desired.
- Click Attach Standards.
- To hide the standards list, click the Select Standards Icon.
Edit Standards
- Place the cursor at the end of the line above the Standards icon,
- Click the Select Standard icon to show the checked standard(s).
- To remove an attached Standard, uncheck the box next to the Standard.
- To add a Standard, place a check in the box next to the Standard.
- Click Attach Standards.
- To hide the standards list, click Select Standards icon.
Remove All Attached Standards and Delete the Standards icon
- Place the cursor at the end of the line above the Standards icon.
- Click the Select Standard Icon to show the checked standard(s).
- Uncheck all boxes next to the Standards.
- Click Attach Standards.
Daily Plan
Note: The date highlighted in the calendar is the active day for the Unit. Make sure the correct date is highlighted before making changes to the Daily Plan
Edit Elements
- To add information to an Element, click Edit.
- A green border will appear around the Element.
- When finished editing an Element, click the disk icon to Save, the disk icon with the orange X to Save and Close, or the orange X to Exit without saving. If changes are made in an Element and the orange X is clicked, a warning will be displayed.
- To hide an Element Box, click Hide.
Note: Only one Element can be edited at a time. It is necessary to close one Element to edit another.
Hyperlinks
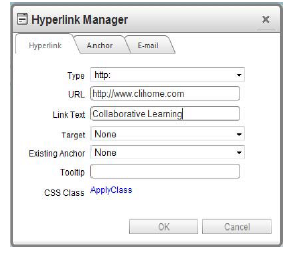
A Hyperlink may be added to a Text Element by clicking the Hyperlink Manager icon.
- Next to URL, type or paste the address of the website.
- In Link Text box, enter a name associated with the link. In the example shown, Collaborative Learning will be what is seen in the Element.
- Click OK.
Daily Plan Required Elements
Teachers are required to complete the content, skills and assessment section of the daily plan. All of the content, skills and assessments from the unit plan will import over from the unit plan. Check the boxes for the content, skills and assessment that you covered that day. (Make sure that you select the correct date on the calendar. Once a week you will have to send the information to Curriculum Mapper by clicking on the “Send to Curriculum Mapper” button.
Reality Check
- Click Reality Check at top of Unit Plan or Daily Plan page.
- Items in the Content, Skills, and Assessment columns that have been checked in the in Daily Plan(s) will have checkboxes selected.
Send to Curriculum Mapper
 1. Click Send To Curriculum Mapper.
2. Click Preview Map to view curriculum map before sending to Curriculum Mapper.
3. Click Send to Curriculum Mapper to create a map in Curriculum Mapper. Only items checked in the Daily Plans in the Content, Skills, and Assessment columns will be sent to Curriculum Mapper.
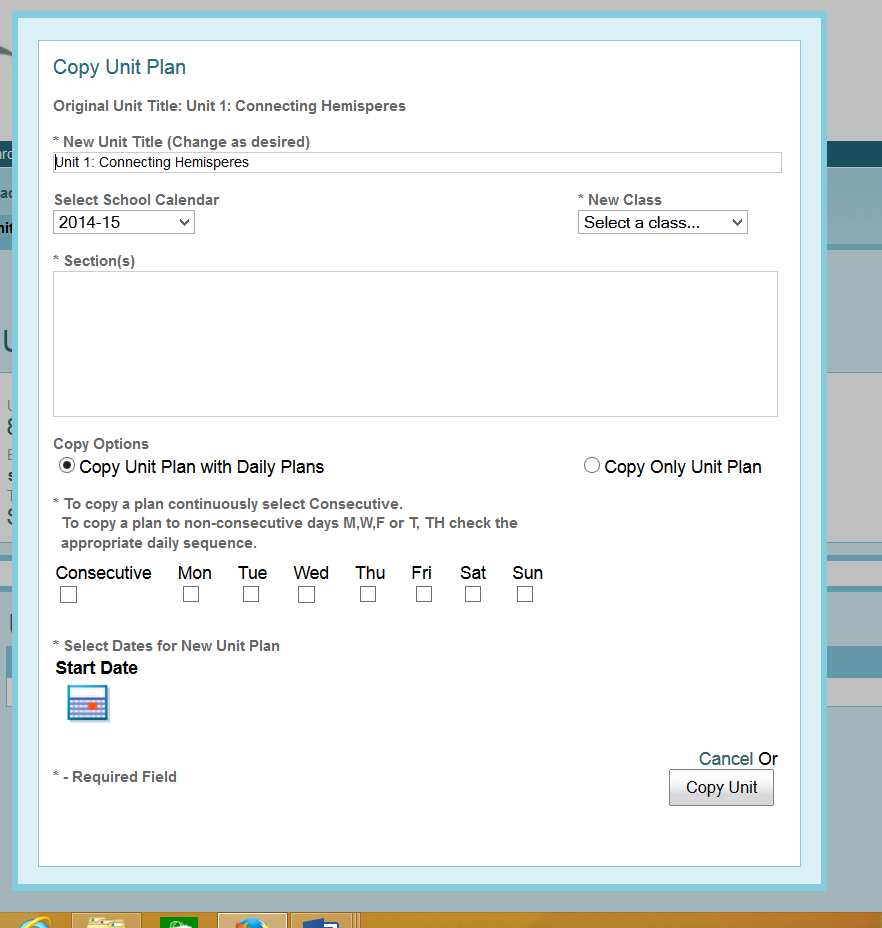
Copy a Unit from Previous Years
- Enter previous year’s unit plan. In upper right hand corner box select Copy.
- Select School Calendar to the current year.
- In the New Class box select the course the unit is being copied to.
- In Copy options select “Copy only Unit”.
- Select the start date and end date for the unit.
- Select the Consecutive box.
- Click on Copy Unit.


